What Chain Skipping Actually Feels Like
Chain skipping has gotten complicated with all the conflicting forum advice flying around. As someone who’s been riding road bikes for twelve years, I learned everything there is to know about what that skip is actually telling you. Today, I will share it all with you.
There are two distinct flavors — and they matter. The first: hard pedal stroke, sudden power loss, chain jumps a cog, cadence hiccups. Happens mid-effort, mid-climb, mid-sprint. Exactly when you need it least. The second flavor is weirder. You’re spinning smooth in most gears, but shift into one specific cog — usually something buried in the middle of the cassette — and it skips. Consistently. Doesn’t matter if you’re standing, seated, or barely turning the pedals. One gear. Every time.
Probably should have opened with this section, honestly — it saves you an hour of cable adjustment that won’t fix anything. Most forum advice treats both scenarios the same. They don’t work the same. Skipping under hard load across multiple gears usually points to cable tension or a bent hanger. Skipping in one specific gear, even at near-zero effort, almost always means that cog is worn down to nothing.
Listen to the sound too. A worn cassette cog makes a distinct metallic tick — a catching, clawing sound — as the chain tries to mesh with teeth that are already hooked. Cable tension issues run quieter. The chain just drifts sideways instead of engaging. Two completely different sounds once you’ve heard both.
Step 1 — Check Chain Wear Before Anything Else
A stretched chain skipping on a worn cassette will not be fixed by indexing your gears. Full stop. Measure the chain first.
Park Tool makes a chain wear indicator — the CC-3.2, around $12 — that takes thirty seconds to use. Drop it onto any section of chain. Sits flat and snug? You’re under 0.5% wear. Good. Drops into the pins slightly? You’re sitting between 0.5% and 0.75% — replace it soon. Falls through completely? Chain is stretched past 1%. Replace it immediately, and brace yourself for what comes next.
Don’t have the tool? The old ruler trick still works fine. Measure exactly twelve inches from the center of one pin to the center of the pin twelve links later. New chain lands dead-on at twelve inches. A stretched chain measures 12.1 inches or more. Sounds like nothing. It’s everything when it comes to whether your cassette survives.
Don’t make my mistake. Three years ago I replaced a worn chain without checking the cassette first. Rode hard for maybe six miles. The new chain skipped on every shift because the cassette teeth were already hooked — the old stretched chain had been slowly eating into them for months. That decision cost me another $85 in parts and one genuinely frustrating Saturday afternoon.
So assume this: if the chain is worn, the cassette might be too. Pull the wheel and look at the cogs directly. New teeth are symmetrical, triangular, uniform. Worn teeth — especially on the third, fourth, and fifth cogs counting from the smallest — look like tiny shark fins, curved forward like hooks. That’s your answer right there. Chain stretched, teeth hooked — you replace both. No negotiating with that math.
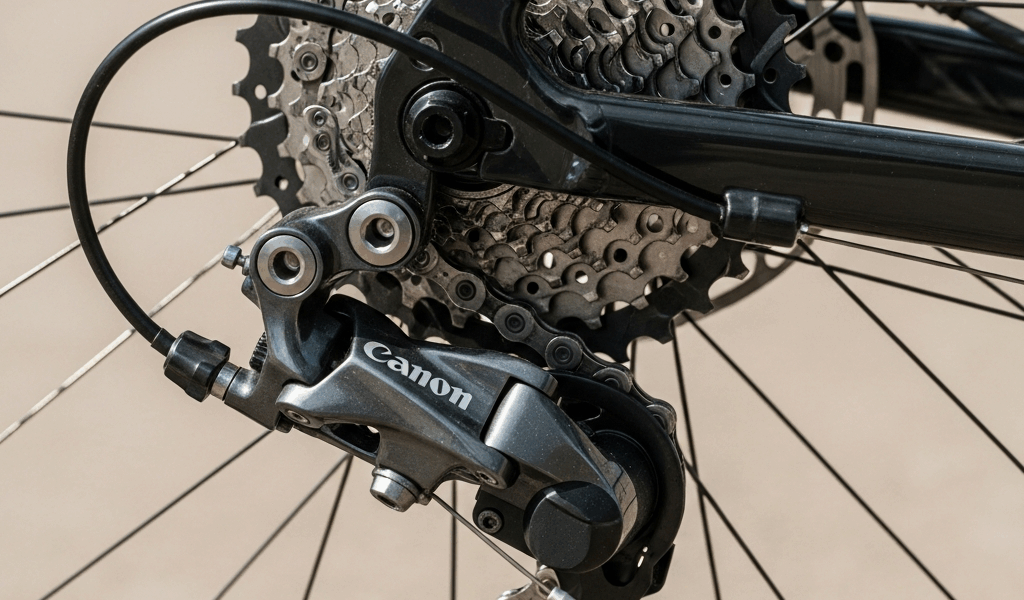
Step 2 — Inspect and Straighten the Derailleur Hanger
A bent derailleur hanger causes skipping that feels almost identical to bad cable tension. The chain won’t mesh cleanly in the smaller cogs. Upshifts hesitate. You adjust the barrel adjuster, ride ten minutes, feel like a genius, and then the skip comes back by the next morning. Maddening doesn’t cover it.
But what is a derailleur hanger? In essence, it’s a small sacrificial alloy tab that bolts to the dropout on your right chainstay. But it’s much more than that — it’s the one piece that positions your derailleur pulley directly in line with the cassette. Hit a pothole, drop the bike in a parking garage, bump it loading into a car — the hanger bends sideways. Even 2 millimeters of bend wrecks indexing completely.
Check it visually first. Shift to the smallest cog. Stand directly behind the bike and look forward. The derailleur pulley should sit perfectly centered beneath each cog as you walk through the gears by hand. If the pulley drifts sideways at all, the hanger is bent.
The Park Tool DAG-2 derailleur alignment gauge — around $20 — is the proper tool for this. It threads into the hanger and tells you whether the hanger runs parallel to the cassette. I’m apparently fairly hard on bikes and the DAG-2 works for me while eyeballing it never really does.
While you won’t need a full shop setup, you will need a handful of tools here — or at least the pencil workaround. Shift to your smallest cog. Hold a pencil vertically along the back face of that cog, parallel to the cassette plane. The derailleur pulley should barely kiss the pencil without pressing into it. Gap? Bent inward. Pressing hard? Bent outward. Not precision work, but it catches real problems.
Straightening a bent hanger requires either the alignment tool or a shop visit — $30 to $50, usually done same day. That’s what makes a proper hanger check endearing to us obsessive drivetrain people. It rules out a whole category of problems before you ever touch a cable.
Step 3 — Cable Tension and Limit Screw Check
Only after ruling out chain wear, cassette wear, and a bent hanger should you touch the barrel adjuster. That order matters.
Shift to your smallest cog. Pedal slowly by hand. Nudge the shift lever — just barely — toward the next cog. The chain should snap up cleanly with almost no drama. Hesitation? Grinding before it engages? You need more cable tension. Turn the barrel adjuster — the threaded collar on the derailleur where the cable enters — counterclockwise a quarter turn. Try again. Repeat until the upshift is crisp and immediate.
First, you should avoid going beyond a full turn without re-centering the barrel adjuster somewhere in the middle of its adjustment range — at least if you want the adjustment to hold across temperature changes. More than two or three full turns of adjustment usually signals something else is wrong upstream.
Check the cables while you’re here. Run your eyes along the full length of both cables from shifter to derailleur. Kinked housing? Frayed inner wire? A frayed wire increases friction enough to make indexing feel completely random. Kinked housing does the same thing. Both mimic indexing problems while being entirely separate issues. Replace cable and housing together — full housing replacement runs $20 to $40 at most shops if you’d rather not DIY the whole thing.
When the Skip Only Happens in One Gear
So. Chain isn’t worn. Hanger is straight. Cable tension is dialed. And the chain still skips in the fourth cog. That specific cog is worn — and nothing external fixes a worn cog.
Modern 11-speed and 12-speed cassettes wear fastest in the middle cogs. That’s where most riders live — steady climbing pace, steady flat roads, hour after hour. The smallest and largest cogs last much longer because they see the bike maybe twice a ride.
Worn cog means new cassette. Full replacement runs $60 to $120 depending on whether you’re running Shimano or SRAM and whether it’s entry-level or competition-grade alloy. This new idea of replacing cassette and chain together took off several years later in the cycling community and eventually evolved into the standard approach enthusiasts know and swear by today.
Fresh chain on a worn cassette skips. Fresh cassette under a worn chain skips too. Replace them together — $110 to $170 total — and you actually solve the problem instead of rotating which component is failing slightly less than the other.
So, without further ado — that’s chain skipping under load. Diagnose it in the right order, and the fix takes one afternoon instead of three weekends of frustrated guesswork.

Leave a Reply