How to True a Road Bike Wheel Without a Stand
Wheel truing has gotten complicated with all the gear-obsessed advice flying around. As someone who fixed a wobbling rear wheel in a cold garage with nothing but a $12 spoke wrench and a twist tie, I learned everything there is to know about truing without a stand. Today, I will share it all with you.
My rear wheel developed a 4mm lateral wobble mid-October during a training ride. Local shop quoted me three weeks out. So I flipped the bike upside down onto the saddle and bars, grabbed the spoke wrench, and spent two hours making quarter-turn adjustments in the dark. The wobble didn’t vanish — but it dropped to something barely noticeable at speed. Most guides assume you own a truing stand. This one doesn’t.
What You Actually Need Before You Start
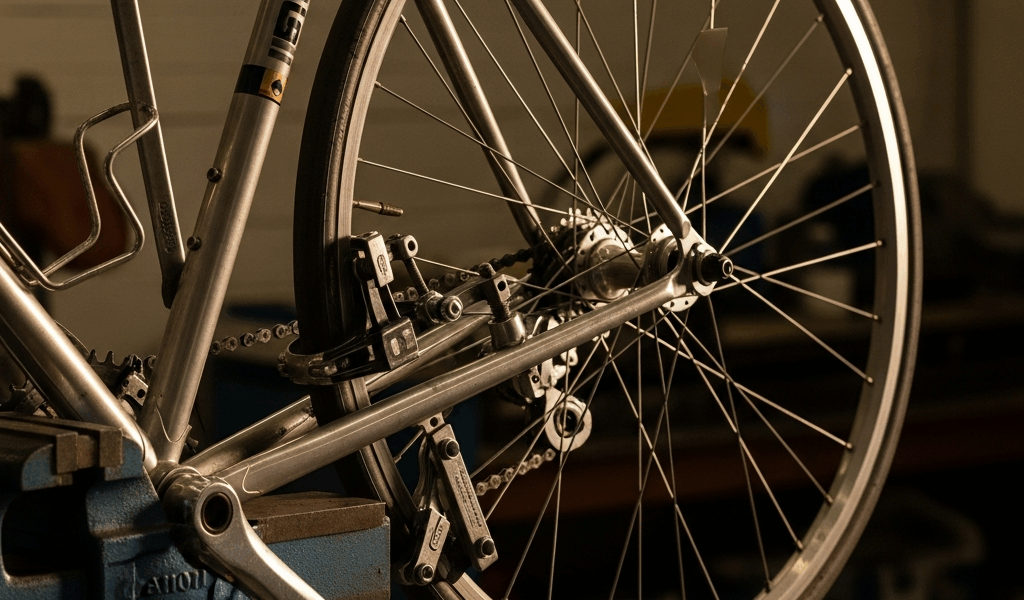
While you won’t need a full workshop setup, you will need a handful of specific items. A spoke wrench is the real gatekeeper here. Road bike wheels typically use 3.2mm, 3.3mm, or 3.5mm spoke nipples — grab the wrong size and you’ll strip the nipple in about three seconds flat. I’m apparently a 3.3mm person, and my Park Tool SW-1 works for me while the generic multi-wrench I tried before never seated properly. Don’t make my mistake. Check your bike manual, or bring the wheel to a shop and identify the size on their stand before buying anything.
You also need a marker or a twist tie. Twist tie wins — you can watch it during the spin without worrying about paint chips flying into your face.
That’s it. Patience is free.
Probably should have opened with this section, honestly. Flip the bike upside down so it rests on the saddle and handlebar. The wheel hangs freely. Spins without hitting anything. I wasted ten minutes trying to true a wheel while the bike sat right-side up, arms tangled in the frame the entire time.
Set expectations now. Lateral wobbles under 2mm are fixable this way. A taco’d wheel — bent badly enough that the rim contacts the brake pad at multiple points — is a shop job. Broken spoke? Shop job. A wheel that won’t hold true after two full adjustment sessions is also a shop job. You’re correcting modest imperfections. Not rebuilding the wheel from scratch.
How to Find the Problem Spoke in 60 Seconds
Spin the wheel slowly. Watch the brake pad gap. The rim will drift toward the pad at one or more points as it rotates — that’s the wobble. Where the rim comes closest to the pad is the high point.
Mark it. Wrap the twist tie around the brake cable directly across from where the wobble peaks. Spin again. The mark should track with the wobble on every rotation. If it doesn’t, spin slower.
But what is a lateral wobble, exactly? In essence, it’s a side-to-side deviation in the rim’s path. But it’s much more than that — it usually signals uneven tension across a cluster of three to five spokes, not a single rogue one. That’s what makes wheel truing endearing to us home mechanics. It’s always a system problem, never a single-point fix. Find the high point of the wobble. The spokes needing attention live in that zone and the zones immediately adjacent. On a standard 28- to 36-spoke road wheel, you’re working a small arc. Not the whole rim.
Skip radial wobble for now — that’s the hop, the up-and-down heartbeat motion. Harder to diagnose by eye, requires more tension work overall. Lateral wobble is visual and tactile. Stick with it for your first session.
The Quarter-Turn Method for Lateral Wobble
So, without further ado, let’s dive in.
The logic is counterintuitive at first. Rim pulling toward the right brake pad means the right-side spokes are too tight relative to the left — or the left-side spokes are too loose. You correct it by tightening left-side spokes in the wobble zone and loosening right-side spokes in that same zone. The rim gets pulled back toward center.
Start with one quarter turn. One. Position the spoke wrench on the first nipple inside the high-wobble zone. Clockwise tightens. Counterclockwise loosens. Here’s the catch — the wrench engages from below the nipple on an upside-down wheel. Direction feels reversed compared to what your hands expect. Test it on a single spoke before making any real adjustments. Turn a quarter rotation and feel whether the spoke got tighter or looser. Do this first. Every time.
Tighten the spoke on the opposite side of the wobble. Quarter turn. Spin the wheel. Check. Loosen the spoke on the wobble side. Quarter turn. Spin. Check. Move to the adjacent spoke. Repeat.
The loop — tighten, spin, check — is everything here. Never stack more than two adjustments without a spin test in between. A quarter turn that feels subtle while the wheel is stationary can shift the wobble significantly once the rim is moving under its own momentum.
Work three spokes maximum if you’re new to this. One centered on the wobble, one on each side of it. Tighten one on the far side, loosen one on the wobble side, then reassess. Wobble drops? Keep going. Wobble moves or worsens? You’ve found your problem fast — just reverse those adjustments and start over.
Three Mistakes That Make the Wobble Worse
Over-tightening a single spoke is the most common failure. Crush one nipple tight trying to fix the wobble in one shot and the wheel goes rigid on that side. Now you’ve created a new wobble on the opposite side, and everything is tension-locked. Always work clusters — three spokes minimum, quarter turns, distributed across the arc.
Losing track of which direction tightens versus loosens happens more than anyone admits. The upside-down position scrambles your spatial instincts. Test one spoke before you’ve made five adjustments and can’t remember what you’ve done. Turn it a quarter rotation. Feel the tension change. Then commit to that direction for the session.
Ignoring the opposite side creates new wobbles where none existed. Tighten the right-side spokes without loosening the left, and the left side ends up slack relative to the right. The wheel loses overall tension balance. It’ll wobble again — just differently. You fix wobbles by evening out tension across both sides, not by overpowering one.
When to Stop and Take It to a Shop
A cracked rim — stop immediately, full stop. A broken spoke is invisible until it fails catastrophically under load. Shop. A wheel that refuses to hold true after two full adjustment sessions — meaning you worked the spokes, spun the wheel, waited a day, and the wobble returned — something structural is bent. Shop.
Any wobble larger than roughly 3mm sits beyond what this method can safely address. At that point you’re fighting major structural damage, and six hours of quarter turns won’t solve it. A professional true runs about $20 to $30. For a training wheel you’re actually relying on, that’s a bargain. A basic truing stand — something like the Park Tool TS-25 at around $45 — pays for itself quickly if you ride year-round and do your own maintenance. But the upfront cost and storage space aren’t practical for most people. The shop visit is the smarter call.
The upside-down frame method works. It’s slow. It requires patience and honest self-assessment about what you’re actually seeing. But a slightly bent wheel that becomes rideable again — without a three-week wait or a $50 tool purchase — is exactly the kind of outcome that makes learning this worthwhile.


Leave a Reply