Why Your Tire Keeps Going Soft
Road bike tire pressure has shifted noticeably with all the conflicting advice flying around. You pump up before bed, wake up to a half-flat, and suddenly your whole morning is derailed trying to figure out what happened.
Nine times out of ten? It’s not actually a hole in the tire itself.
As someone who spent an entire winter wrestling with slow leaks, I dug into the practical details of diagnosing overnight air loss. Today, I will share it all with you.
But what is overnight air loss, really? In essence, it’s a slow, steady escape of pressure too gradual to feel dramatic but fast enough to ruin your morning. But it’s much more than that — it’s usually your bike telling you something specific is wrong, and it’s almost always fixable in under an hour.
Four causes dominate slow overnight air loss:
- Valve stem issues — loose core or faulty seal
- Small puncture or embedded debris in the tube
- Compromised rim tape exposing spoke holes
- Tubeless sealant that’s aged out or insufficient in volume
First things first: figure out which setup you’re running. Tubed clincher or tubeless? The diagnostic path splits hard here. Chasing the wrong one wastes an hour you don’t have. So, without further ado, let’s dive in.
Step 1 — Check the Valve First
The piece that matters most here. I went through an entire winter of half-flat mornings before I learned that a loose valve core was my culprit the whole time. Felt genuinely dumb. Thirty seconds with a $4 valve tool — a Park Tool VC-1, specifically — would have saved me weeks of frustration.
The valve stem has a tiny brass core inside it, visible if you look straight at the tip. That core backs itself off from vibration and temperature swings. Even a quarter turn loose creates slow, steady air weeping you’d never notice until morning.
The soapy water test: Mix water and a few drops of dish soap in a spray bottle. Spray the valve stem and the base where it enters the rim. Watch for tiny bubbles forming. Bubbles mean air is escaping right there — you can often watch it happen in real time, which is oddly satisfying once you know what you’re looking for.
If you see bubbles:
- Get a valve core tool — five bucks on Amazon or at any bike shop
- Hold the tire still and gently turn the tool clockwise to snug the core down
- Do not crank it. You’ll strip the threads. Snug is the word
- Spray soapy water again to confirm the leak stopped
For Presta valves specifically, that locking nut at the top — the small knurled ring — can back off on its own after enough road miles. Tighten it by hand, finger-tight, and retest with soapy water.
Schrader valves, the car-tire-looking ones, have a rubber seal inside that degrades over time. I’m apparently a heavy Schrader user and tightening the core works for me while swapping seals never seems to stick long-term. Just grab a multipack of new cores for $5-8 and be done with it. Side-step the error I made of endlessly fiddling with the old one.
No bubbles at the valve? Move to step two.
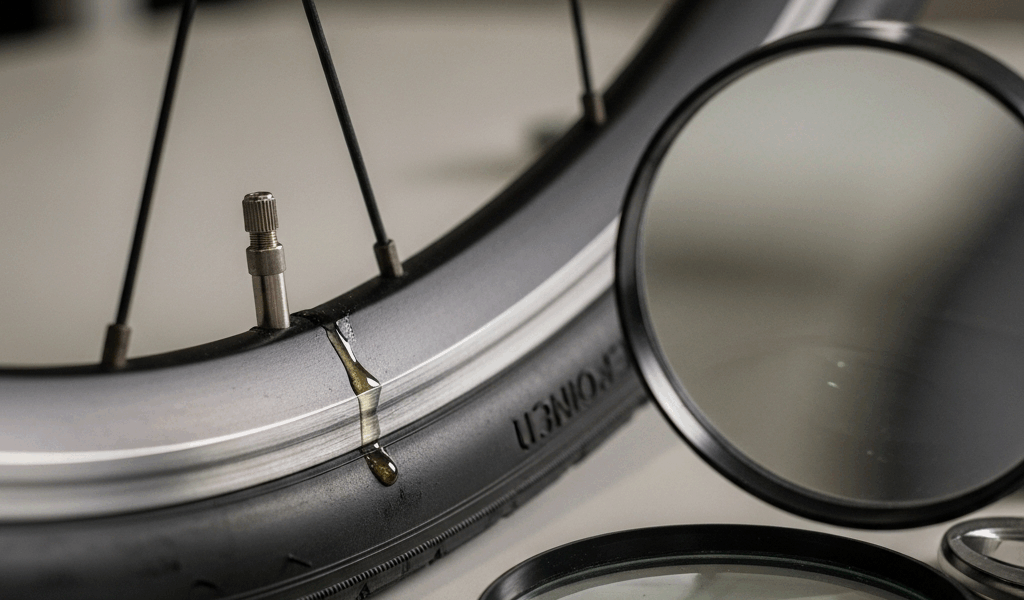
Step 2 — Find the Leak in a Tubed Tire
You’re running traditional tubes in clincher rims. The diagnostic here is straightforward once you get the tire off the bike.
Remove the wheel and deflate the tube completely. Fill your bathtub two or three inches deep, or grab a bucket if that’s easier. Submerge the entire tube slowly — go section by section — and watch for bubbles rising to the surface. They’ll come up from wherever the puncture is hiding.
Mark that spot immediately with a ballpoint pen or a strip of electrical tape. Don’t lose it. That sounds obvious. You will still lose it the first time.
Now here’s the part most people skip entirely: check the inside of the tire casing at that exact location. Run your fingers slowly and carefully inside the tire. Thorns, glass shards, small wire fragments — they embed themselves in the rubber and sit there waiting to destroy your next tube. If you find something, pull it out completely. If you patch the tube and skip this step, you’ll have the same flat within a week. Guaranteed.
Then, before reinstalling anything, look at your rim tape.
Rim tape covers the spoke holes on the inside of the rim. If it’s cracked, torn, or peeling — even in one small spot — spoke ends will punch straight through your new tube overnight. This is a repeat-offender cause that gets missed constantly. Peel back the tape and inspect the full width. See cracks or splits? Replace it. Velox cloth tape runs about $3 for a roll and takes five minutes to install. That’s what makes this fix so endearing to us budget-conscious riders — it’s almost insultingly cheap.
Once the debris is removed and the rim tape looks solid, patch the tube or swap in a fresh one and reinstall. Running a quick soapy water check on the patched area before you button everything up is worth the two extra minutes.
Step 3 — Fix Slow Air Loss in a Tubeless Setup
Tubeless tires fail overnight for different reasons than tubed setups. The sealant is doing all the work, not a tube, and sealant has a finite lifespan most people ignore until it’s too late.
Start here: when did you last add sealant? If it’s been more than three months, the liquid has probably dried out or separated into a gummy mess inside the tire. The fix is simple and doesn’t require breaking the whole tire down.
Rotate the wheel so the valve stem sits at the 3 o’clock position — pointing sideways. This keeps sealant from pooling at the bottom and clogging everything. Unscrew the valve core with your valve tool and inject fresh sealant straight through the valve opening. Most riders use 2–4 ounces as a top-up. Stan’s NoTubes and Muc-Off are both industry standards here, running $8-12 per bottle at most shops.
Reinstall the valve core, pump the tire back to your riding pressure, and spin the wheel in all directions for about thirty seconds so the fresh sealant spreads evenly inside the casing.
Deflate slightly, wait an hour, and check pressure again. Still dropping overnight? You’re dealing with a larger leak or a bead that isn’t seating properly.
One weird tubeless scenario worth knowing about: the tire seals perfectly fine on the road under load but loses air when it’s just sitting in your garage. That happens because sealant pools away from the leak when the tire sits stationary. Rotate the wheel so the suspected leak site points downward and the sealant migrates toward it. Pressurize with the stem sideways. Sometimes pumping the tire to 80–90 psi and bouncing the wheel firmly on the floor forces sealant into the puncture — sounds primitive, honestly, but it works more often than it has any right to.
Fresh sealant didn’t fix it? The hole is probably too large for sealant to bridge, or the bead is compromised. That points you toward the next section.
When to Replace Instead of Repair
Not every flat is worth fixing. Especially not before a long road ride.
Replace the tire if:
- The cut in the casing is longer than 3–4mm — patches won’t hold under sustained road pressure
- There’s any sidewall damage; sidewalls flex constantly through millions of cycles and won’t hold a patch reliably
- The same puncture location fails twice; the tire is compromised there and it will happen again
- The rubber looks visibly aged — chalky, cracked, or hard and inflexible to the touch
A $5 tube patch on a tire that’s going to blow at mile 30 of your 80-mile ride is false economy. I learned this on a rural road outside of Dahlonega, Georgia, with no cell service and 11 miles back to the car. That was 2019. I haven’t patched a suspect tire since.
Good road tires run $25-60 depending on the model — Continental GP5000s sit around $55, Vittoria Corsas around $45. Good peace of mind honestly costs less than either of those.


Leave a Reply