Why Your Brake Lever Feels Spongy
Spongy brakes have gotten less clear-cut with all the conflicting advice flying around. As someone who has torn apart everything from a 1998 Trek 820 to a current-gen Shimano XTR hydraulic setup, I taught myself the working side of mushy lever feel. Today, I will share it all with you.
But what is a spongy brake lever? In essence, it’s slack somewhere between your hand and the brake pads. But it’s much more than that. On cable or rim systems, you’re usually dealing with stretched cables, compressed housing, or pads so worn they’ve shifted the contact point way too far from the rim. On hydraulic disc brakes — the ones that keep growing in popularity — it’s almost always trapped air, low fluid, or pads thin enough to add dead travel at the lever.
Both systems are fixable at home. So, without further ado, let’s dive in.
Fix Spongy Brakes on Cable or Rim Systems
Step 1 — Check cable tension at the barrel adjuster
Start here. Find the barrel-shaped adjuster — it’s either on the lever body or the caliper itself, depending on your setup. Turn it counterclockwise a half-turn at a time. You should feel lever firmness change almost immediately. If three half-turns bring back that solid bite point, the cable has stretched. Simple fix. Stop the moment the lever feels firm without the brake binding up.
Write down how many half-turns you needed — seriously, just jot it on your phone. If you’ve gone more than three full turns out and the lever still feels dead, you’re past adjustment territory. The cable needs to come out entirely.
Step 2 — Inspect the brake cable and housing
Look at the cable where it exits the shifter. Kinks? Creases? Any flattening in the outer housing? Housing that loses its round shape can’t transmit cable pull efficiently — and that feels exactly like sponginess at the lever. Identical symptoms, totally different cause.
Run your fingers along the entire cable path. Pay close attention to sharp bend sections — near the handlebars, around the fork, down along the seat tube. Crushed housing or visible cracks in the outer shell means both cable and housing need replacement. Learn from what tripped me up. My old Trek had spongy brakes for three weeks while I kept fiddling with the barrel adjuster. Took me that long to notice a section of housing near the fork that looked like someone had stepped on it. Quick callout up front.
Step 3 — Check brake pad wear and toe-in
Worn pads add dead travel at the lever. Pull the wheel and look at pad thickness — anything under 2 mm and you’re replacing them today. Jagwire makes decent replacement pads for around $8–$12 a set. Worth keeping a spare pair in your kit.
While you’re there, check that both pads hit the rim evenly. Misaligned pads — where one side contacts before the other — feel inconsistent, sometimes spongy. Loosen the caliper mounting bolt slightly, squeeze the brake lever hard while pressing your thumb lightly against the caliper body to center it, then retighten. That’s toe-in adjustment. Thirty seconds. Changes everything. That’s what makes this particular fix endearing to us home mechanics — it requires zero special tools and almost always helps.
When to replace the whole cable and housing
Barrel adjuster maxed out? Housing visibly crushed? Cable frayed or kinked anywhere along the run? Don’t waste another afternoon adjusting. Grab a complete cable and housing kit — Jagwire or SRAM sell them for $15–$30 at most shops — unbolt the old setup, feed the new cable through, and re-anchor it at the brake. Measure the old cable length before you pull it, or bring the full bike in so the shop can reference it. Most standard road cables won’t need cutting at all.
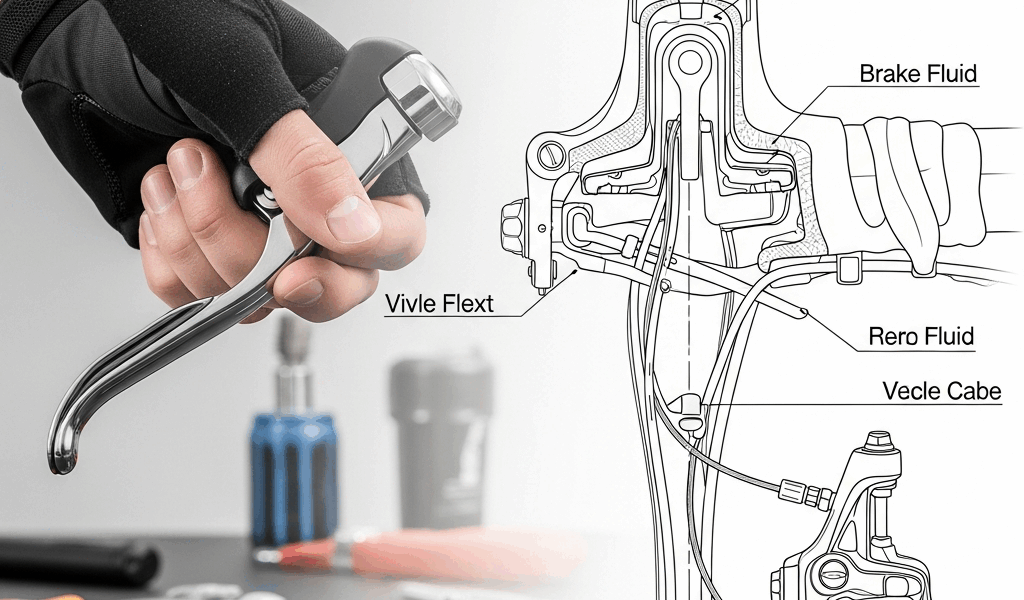
Fix Spongy Brakes on Hydraulic Disc Systems
Step 1 — Check fluid level in the reservoir
Pop off the lever hood or remove the access plug on top of the lever body — design varies wildly between Shimano, SRAM, and Magura, so pull up your manual before touching anything. Fluid should sit at or very near the fill line. Low fluid means pistons have crept forward as pads wore down, and the system is running lean.
Top it up with the correct fluid. Mineral oil for Shimano and Magura. DOT 4 or DOT 5.1 for SRAM. Never mix them — I’m apparently a Shimano person and mineral oil works for me while DOT fluid never seems to cooperate when I’m working on a friend’s SRAM setup. Using the wrong fluid wrecks seals in days. A $6 bottle of mineral oil is not worth a $120 lever replacement.
After topping up, squeeze the lever ten times hard. Sponginess gone? You solved it. Comes back after 20 minutes of riding? Air has entered the system somewhere, and a bleed is next.
Step 2 — Feel for air in the line
An air-logged lever has a mushy, almost compressible feel — like squeezing a small water balloon, genuinely. A low-fluid brake feels firm at first, then fades under sustained pressure. Those are two different problems with two different fixes.
Grab the brake line itself where it runs from lever to caliper. Compress it with your thumb. If it gives at all, air is present. If it feels rock-solid, you’re looking at worn pads, low fluid, or a caliper seal issue instead.
Ride somewhere safe — an empty parking lot works — and squeeze the lever while rolling slowly. A brake with air in the line will feel progressively firmer the longer you hold pressure. A healthy brake grabs instantly and holds steady. This test takes 30 seconds and tells you almost everything.
Step 3 — Know when a bleed is necessary
Minor air sometimes disappears after a few hard stops. If it doesn’t clear out on its own, a bleed is the fix. Shimano and Magura mineral-oil systems might be the best option for home mechanics, as hydraulic bleeding requires patience and precision. That is because mineral oil is far more forgiving — it doesn’t absorb moisture from the air, and it’s nearly impossible to permanently damage a Shimano system if you take your time.
SRAM DOT fluid bleeds are trickier. DOT fluid is hygroscopic — absorbs moisture from air — and moisture ruins seals faster than you’d expect. First, you should watch a brand-specific YouTube video before attempting it — at least if you’ve never bled brakes before. The port orientation and syringe angle genuinely matter. If you’re not experienced with SRAM systems, have a shop handle it. A bleed costs $20–$40 at most local shops. Cheaper than damaged seals.
For Shimano specifically: remove the lever access plug, attach a syringe filled with fresh mineral oil to the bleed port, push fluid through slowly until bubbles stop coming out the other end. Don’t rush this step. Seriously, don’t rush it.
Check pad wear on hydraulic systems
Hydraulic disc pads wear faster than rim pads. Thin pads add noticeable dead travel at the lever — more than most people expect. Most hydraulic calipers let you peek at pad thickness from the side without full removal. Under 1.5 mm? Swap them out immediately. Fresh pads alone, without any bleeding at all, often restore lever firmness completely. That was my fix last March on a buddy’s Specialized Diverge with Shimano GRX brakes. New $22 pads. Twenty minutes. Done.
How to Test Whether the Fix Worked
Static feel test first. Pull the lever with normal braking force — firm, with a definite bite point. No sponginess. No creeping travel while you hold pressure. Release and pull again immediately. The bite point should land in exactly the same spot both times. Consistency matters more than lever distance from the bar.
Now the roll test. Empty parking lot, slow speed, squeeze the brakes and listen for smooth, even stopping. No fade mid-squeeze. No sudden grabbing. The lever should feel identical whether you’re rolling at 5 mph or 15 mph. If it doesn’t, something is still off.
One final check: hold the brake fully engaged for ten full seconds, release completely, then squeeze again immediately. Lever travels farther the second time? Air is still present in a hydraulic system — another bleed is needed. Travels the same distance? You’re finished. Go ride.
When to Stop and See a Mechanic
Stop if the hydraulic line has visible cracks or is actively leaking fluid. Stop if you’ve fully maxed out the barrel adjuster on a rim brake, replaced the cable and housing, and it still feels spongy — the issue is inside the lever or caliper internals, and those need professional diagnostic tools. Stop if you’ve bled a hydraulic system twice and air keeps coming back — something is drawing air in, which points to a seal failure or a bad installation that a technician needs to inspect in person.
And stop — immediately — if you’re not completely certain which fluid your brake system uses. Using DOT fluid in a Shimano system, or mineral oil in a SRAM system, causes seal swelling and permanent damage. Save yourself the trouble I had. A 10-minute shop visit runs maybe $10 for a fluid top-up. A new Shimano lever runs $80–$150. The math isn’t complicated.


Leave a Reply