“`html
Why Road Bike Handlebars Loosen Up
Road bike handlebars getting loose is probably the most common maintenance complaint I hear from cyclists who’ve been riding the same bike for six months or longer. It’s frustrating because you tightened them once, assumed they’d stay put, and now your bars are shifting under hard braking.
The culprit isn’t usually poor assembly—it’s physics, honestly. Every time you brake, accelerate, or hit a pothole, your handlebars experience micro-movements. Vibration compounds the problem. Road surfaces send constant energy through the stem, gradually loosening bolts that weren’t torqued precisely the first time. Then there’s temperature. Your carbon fiber bars and aluminum stem expand and contract at different rates on a hot ride versus a cold morning, creating tiny gaps that add up over weeks.
Most DIY cyclists just grab a hex key and crank until it feels tight. That’s exactly how bars get damaged. I learned this the hard way after cracking a $180 set of carbon bars by overtightening the stem bolts—maybe half a millimeter of rotation too much. The micro-cracks didn’t show up immediately. Three weeks later, during a hard sprint, they appeared.
Tools You Actually Need
You need exactly three things. Skip any one of them and you’re working blind.
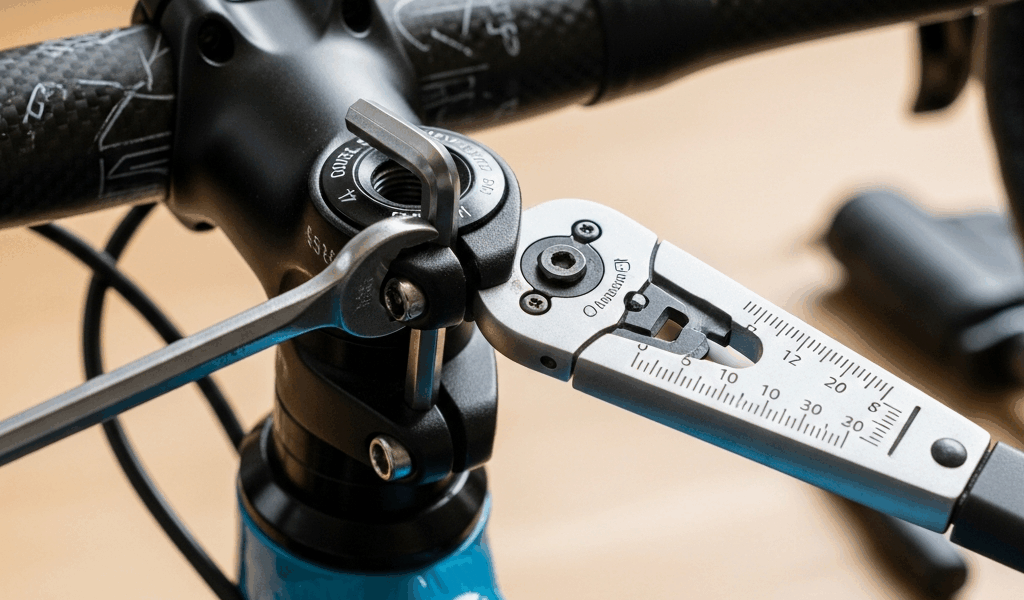
- Torque wrench—4 to 8 Nm range: A Click-type wrench like the Park Tool TW-5.2 runs $40–60 and works perfectly for bar work. Budget options from Topeak or Feedback Sports exist around $25, but they’re less precise. Don’t use a regular adjustable wrench — you can’t feel when you’ve hit the right pressure, and you’ll either under-tighten (bars keep loosening) or over-tighten (cracks appear in carbon or stripped threads in alloy). The torque wrench prevents both problems simultaneously.
- Hex key set in metric sizes: Road bike stems use 4mm, 5mm, or 6mm bolts. Buy a quality set like Wera or Park Tool rather than the cheap multipack. Cheap keys strip bolt heads, and a stripped bolt means you’re buying a new stem. I’ve seen riders ruin $120 stems because their hex key was slightly loose in the bolt head.
- Degreaser and light grease: Use a citrus-based degreaser like Finish Line or Simple Green. It won’t eat through paint or anodizing. For regreasing, use light machine oil or bike-specific assembly grease—not heavy waterproof grease, which traps dirt and causes corrosion. Park Tool’s Polylube 1000 is standard here.
A clean shop towel rounds out the essentials. That’s genuinely all you need.
Identifying Your Stem Type First
Modern road bikes use threadless stems almost exclusively. Here’s how to tell what you have in 30 seconds.
Look at where the handlebars enter the stem. On a threadless stem, you’ll see a vertical clamp band or clamp block surrounding the bar — usually two bolts on opposite sides, or four bolts in a square pattern. The stem itself doesn’t thread onto the fork steerer tube. Instead, it’s held by a top cap and expansion bolt that cinch the fork steerer inside the stem.
A threaded stem — genuinely rare on modern road bikes, but you might own a 1990s Specialized or Trek — has the stem screwing directly onto a threaded fork steerer. You’d tighten bolts running horizontally into the fork. If you own a bike older than 2005 and you’re not sure, this is worth checking.
For threadless stems, which is what 99 percent of you reading this have, the tightening sequence matters. The top cap bolt (the one on top of the stem, pointing straight up) gets tightened first. It preloads the bearings. Then you tighten the bar clamp bolts in a cross pattern — think of it like tightening a car wheel. This prevents the bar from twisting to one side.
Threaded stems don’t need a top cap, so you skip that step entirely.
Step-by-Step Tightening Process
Caught off-guard by loose bars during a group ride, I learned the hard way that rushing this process causes problems. Take 15 minutes. Seriously.
Step 1: Place your bike in a stand so the front wheel is off the ground and the handlebars are at eye level. If you don’t have a stand, lean the bike against a wall or have someone hold it steady.
Step 2: Locate all the bolts on your stem. For threadless stems, there’s a top cap bolt (usually 4mm or 5mm hex) and two to four bar clamp bolts on the sides. Note their current positions with a marker or mental snapshot. This helps you spot if they’ve moved.
Step 3: Loosen the bar clamp bolts first — just a quarter turn each. Don’t remove them. You’re creating wiggle room so you can realign the bar if needed.
Step 4: Grasp the handlebars and check for side-to-side play. Push the bar left, then right. If it moves, the stem clamp bolts are too loose. If you hear a creak or feel grinding, there’s corrosion or dirt between the bar and stem.
Step 5: If there’s side-to-side play, remove the bar clamp bolts completely and slide the bar out partially. Clean the inside of the stem clamp with your degreaser and the outside of the bar with a clean towel. Any dirt or old grease here prevents proper clamping. This is what most guides skip, and it’s why bars keep loosening.
Step 6: Apply a thin coat of light grease to the bar and stem clamp surfaces. Not too much — a tacky layer, not a glob. Reinstall the bar.
Step 7: If you have a threadless stem, tighten the top cap bolt first. Set your torque wrench to 4 Nm (or 3.5 Nm if the cap is alloy and your bike is older). Tighten until the wrench clicks. This preloads the headset bearings. If your handlebars now have zero side-to-side play, you’re good. If they still move, your headset might be loose — separate issue, worth addressing before you proceed.
Step 8: Tighten the bar clamp bolts in a cross pattern. If you have two bolts (top and bottom), tighten the top first, then the bottom. If you have four bolts, tighten them in an X pattern: top-left, bottom-right, top-right, bottom-left. Torque each bolt to 5 Nm for carbon bars or 6 Nm for alloy bars. The wrench will click when you hit the target.
Step 9: Do a second pass over the bar clamp bolts at the same torque value. This ensures even pressure. Check that your handlebars are perfectly straight relative to the front wheel. If they’re angled, loosen slightly (don’t fully unclamp), rotate them to center, then retorque.
Step 10: Test for movement. Grab the handlebars and try to rotate them in the stem. There should be zero play. Grasp the bar and frame together, twist slightly — nothing should move. If you hear a creak, your headset is loose, not your stem.
Common mistake: Tightening the top cap bolt too hard. People see a loose bar and crank that cap bolt to 8 or 10 Nm thinking it’ll solve the problem. It doesn’t. The top cap preloads bearings, not the bar clamp. Over-tightening it just stresses your headset.
How Tight Is Too Tight
Carbon fiber bars fail silently. Aluminum bars fail loudly. Neither is fun.
Carbon bars should be torqued between 4 to 5 Nm. This is the range where the clamp grips without crushing the bar. Below 4 Nm, bars slip. Above 6 Nm, micro-cracks form inside the carbon weave. These cracks are invisible for weeks. You might feel a slight flex that wasn’t there before, or one day mid-ride the bar suddenly twists. At that point, the damage is internal and unrepairable.
Alloy bars handle 5 to 6 Nm comfortably. They’re more forgiving than carbon. Still, over-tightening alloy bars strips the threads inside the stem clamp. Once threads are stripped, the bolt spins freely and you’re buying a new stem.
How do you know you’ve over-tightened? First sign is a sharp cracking sound when you flex the bar side-to-side by hand after installation. Second sign is visible whitening or stress marks on the bar surface near the clamp. Third sign — the expensive one — is sudden failure under load.
A torque wrench eliminates guessing entirely. That’s the whole point. The wrench clicks at your target number and you stop. No more, no less. I’ve never had a bar loosen after proper torquing. Every loose bar I’ve encountered was either installed without a torque wrench or installed by someone who didn’t know stem types differ.
Your expensive bike parts deserve those 15 minutes of attention and a $50 tool. Future you will thank current you when your handlebars stay locked in place for the next year.
“`

Leave a Reply