Why Cleat Position Is Usually the First Thing to Check
Road bike cleat position and knee pain has grown more complex with the conflicting advice flying around. But here’s what I wish someone had told me before I dropped money on a professional fit: most of this is fixable in your garage, in under an hour, with a 4mm Allen key.
Your cleats control three things — how far forward or backward they sit on your shoe (fore-aft), which direction your foot points (rotational angle), and how far inboard or outboard they sit relative to your foot (lateral offset). Get any of these wrong and your knee starts tracking a line it was never designed to handle. The body doesn’t complain immediately. It complains predictably. The same adjustment mistake produces the same pain. Every single ride.
That’s actually your advantage. Repeatable pain means a repeatable fix.
Match Your Pain Location to the Problem
Worth putting near the top. Stop trying to diagnose yourself with generic cleat advice. Your knee is already telling you exactly what went wrong — you just have to listen to where it hurts.
Front of Knee Pain — Cleat Too Far Forward
Pain sitting behind or just above the kneecap means your cleat is too far toward your toes. Your quads are working overtime because the pedal stroke puts your knee in excessive extension through most of the downstroke. Move the cleats back 2–3mm toward your heel and retest. Most riders find relief in a single adjustment. I did — after about six weeks of ignoring it, which wasn’t my finest moment.
Back of Knee Pain — Cleat Too Far Back
Feeling it in the hamstring insertion, or deep in the joint behind your knee? Your cleat is too far toward your heel. This keeps your knee bent longer than it should be, loading up the posterior knee capsule in a way that adds up fast over a 40-mile ride. Shift the cleat forward 2–3mm. Relief tends to show up on the very next ride.
Inside Knee Pain — Cleat Toed Out or Inboard Offset Wrong
Medial knee pain — the inner side — happens when your foot splays outward or your cleat sits too close to your bike’s centerline. Your knee collapses inward under load. Valgus stress, if you want the clinical term. Toe the cleat inward by 2–3 degrees first. If that doesn’t do it, move the cleat slightly outboard to widen your stance. Most riders need one or the other. Rarely both.
Outside Knee Pain — Cleat Toed In or Outboard Offset Wrong
Lateral knee pain is the flip side. Your foot is pointing inward too much, or your cleat is mounted too far from your centerline — your knee pushes outward under pedaling load. Toe the cleat outward by 2–3 degrees first. If that’s not enough, move it slightly inboard to narrow your stance. Start with rotation before you touch lateral offset. Most fixes live in the rotation adjustment anyway.
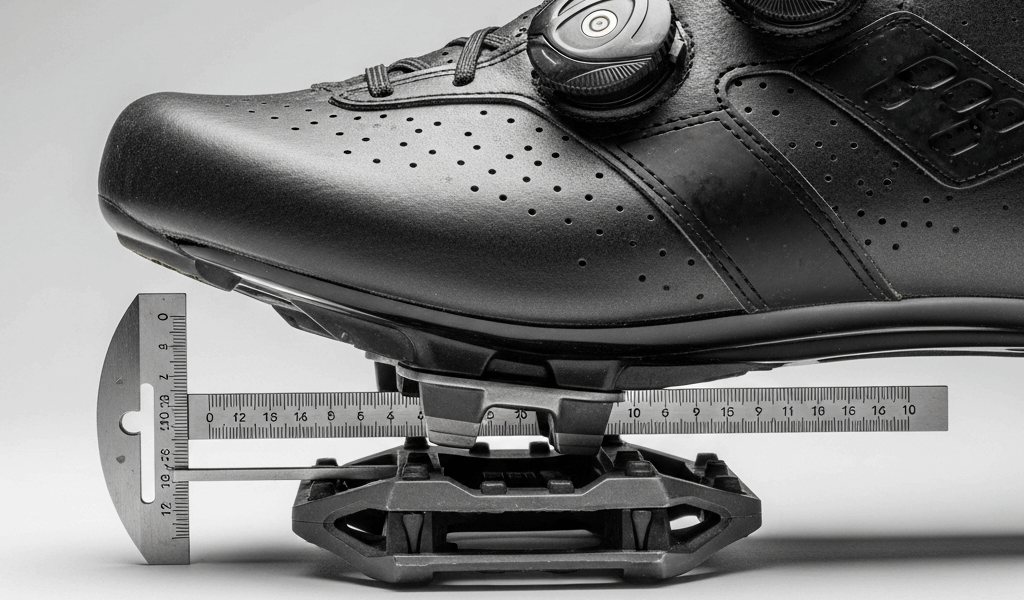
How to Adjust Cleat Position Step by Step
While you won’t need a full fitting studio, you will need a handful of things: a 4mm Allen key, a Sharpie or some painter’s tape, and about 20 minutes somewhere quiet. Here’s what I do every time.
- Mark your baseline. Before touching anything, draw a line on the cleat where it meets the shoe sole — and another at the pedal axle contact point. You need a visual reference. Without it, you’re guessing how much you’ve actually moved things, which defeats the whole process.
- Check fore-aft position first. The ball of your foot — that bump at the base of your big toe — should sit directly over the pedal axle. Non-negotiable. Loosen the cleats, slide them forward or back, use your marker line as a guide, and tighten back down. This one fix alone solves roughly 60% of cleat-related knee pain. Seriously.
- Adjust rotation second. Clip in and pedal slowly. Your knees should track over your toes — not splayed outward, not pigeon-toed inward. Most systems give you somewhere between 0 and 9 degrees of rotational adjustment. Start with 2–3 degrees of movement. Not 9. Don’t repeat what I did.
- Fine-tune lateral offset last. This controls how far inboard or outboard the cleat sits on your shoe. Wider offset increases your stance width. Narrower decreases it. Make 1–2mm changes maximum. Don’t chase this one until fore-aft and rotation are already dialed.
- Tighten everything properly. Check that your marks haven’t drifted during adjustment. Cleats slip if you don’t crank them down — not dangerously, just annoyingly, and usually at mile 18.
Golden rule: one change, one full test ride, then adjust again if needed. Don’t make three changes simultaneously and wonder which one worked.
How Much Float You Actually Need
But what is float? In essence, it’s rotational freedom — how many degrees your foot can swivel before the cleat releases from the pedal. Zero degrees means locked in completely. Six degrees means your foot has room to move naturally through the stroke. But it’s much more than a technical spec — the wrong float choice can override every other adjustment you make.
I’m apparently a 4.5-degree float rider, and Look Kea cleats work for me while zero-float systems never did. I used to race on 0-degree cleats because I thought restriction meant efficiency. It meant knee pain, actually. Locking out your natural foot rotation just forces the knee to compensate for movement that has to go somewhere.
- Look Kea cleats come in 0, 4.5, and 9 degrees — straightforward color coding.
- Shimano SPD-SL offers fixed (0) and 6 degrees. Two options, easy choice.
- Speedplay goes 0, 15, and 26 degrees — their naming system is genuinely confusing, but high float is their whole identity.
If you’re buying new cleats right now and you currently have knee pain, order mid-float. You can always restrict float later by shimming or upgrading. Starting locked down and deciding you need float means buying another set entirely. So, without further ado, start in the middle and work outward from there.
Test Ride and Confirm the Fix
After adjusting, ride for 20 minutes at normal effort. Skip the intervals and the climbs — just a steady pace on familiar terrain. Pay attention to the exact spot that was giving you trouble before.
Real improvement doesn’t feel like “better.” It feels like the pain simply doesn’t show up. Not less painful. Not manageable. Gone. If it’s improved but still present, you’re moving in the right direction — just make another small adjustment the same way. If it got worse, you overcorrected. Go back the other direction by 1mm and ride again.
Two full rounds of adjustments with no improvement? That’s when a professional fit — yes, the $250–$300 kind — becomes worth every dollar. But honestly, most cleat-related knee pain dies after the first tweak. You’re usually one 2mm change away from riding completely pain-free.

Leave a Reply