Start Here — What Bad Shifting Actually Sounds Like
Rear derailleur problems have become tricky with all the conflicting advice flying around. As someone who has spent way too many driveway hours crouched over a bike with chain grease on both forearms and the cable tension completely wrong, I taught myself the working side of bad shifting sounds. Today, I will share it all with you.
There are three failure modes. Each one points somewhere different. Slow upshifts — where the chain takes a full second to climb to a smaller sprocket — that’s loose cable tension. The derailleur cage just doesn’t have enough pull. Hesitant downshifts feel mushy and delayed, then suddenly the chain drops. Too much tension. Ghost shifting is the weird one. The chain jumps sprockets under load with no input from you, or chatters between two gears. That’s usually a bent hanger or a worn jockey wheel. Not a cable problem at all.
Check Cable Tension First — It Fixes 60% of Cases
Important part first. Most riders never touch the barrel adjuster, yet it clears up most shifting complaints in under five minutes. So, without further ado, let’s dive in.
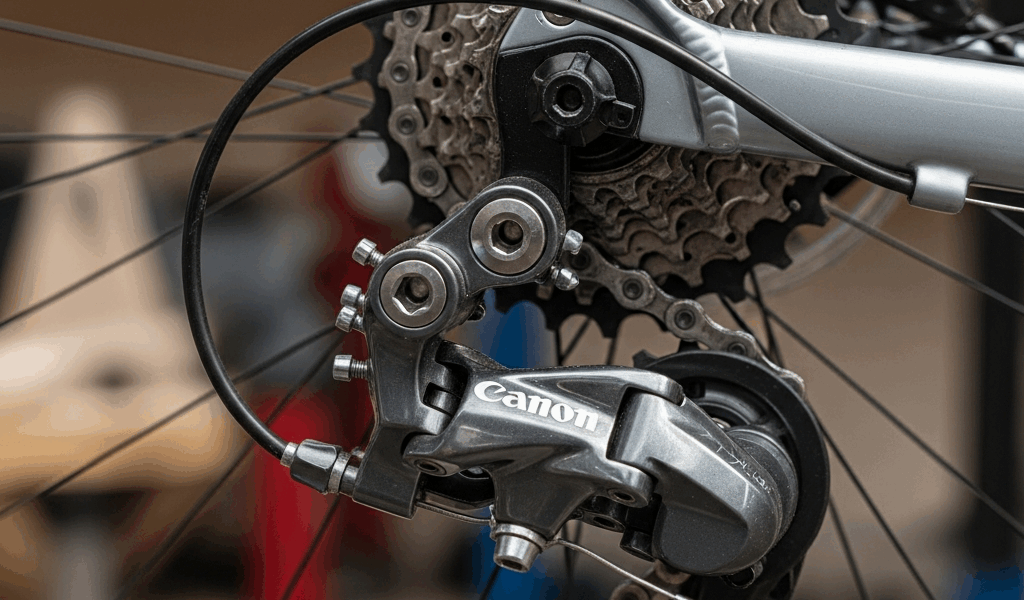
On the derailleur body you’ll see a small cylinder threaded into the cable entry point. That’s your adjuster. Counterclockwise — out of the derailleur — adds tension. Clockwise — into the derailleur — releases it. A quarter turn at a time. Shift through the whole cassette after each adjustment. You’re listening for a crisp, clean click when the chain settles onto each sprocket. No slop. No delay. Definition.
The same adjuster lives on the shifter body, usually tucked under the down tube. Some newer bikes — my Trek FX3 has one — put it right on top where you can reach it without contorting. Same direction rules apply either way. Here’s the distinction worth knowing: derailleur-body adjustments move the whole range together, while shifter-body tweaks fine-tune the indexing across individual sprockets. Start at the derailleur. Dial in your quarter turns. Move to the shifter only if the chain still hesitates between specific cogs.
But what is a frayed cable, really? In essence, it’s a cable that’s structurally compromised at the housing exit. But it’s much more than that — it’s a problem that doesn’t respond to barrel adjustments no matter how patient you are. If the cable looks fuzzy at the cut end or has a hard kink where it exits the housing, stop turning the barrel adjuster. Replace the cable. A new Shimano shift cable runs about eight to twelve dollars at most shops. Fifteen minutes to install. I once spent 45 minutes trying to tune a frayed cable into submission. Spare yourself the wrong turn I took.
Four full quarter-turn cycles in either direction and still nothing? Stop. You’re adjusting something that isn’t the actual problem.
Limit Screws and What They Actually Control
The H and L screws each do one job. The H screw limits how far inward the cage moves — toward the smallest cog. The L screw limits outward travel — toward the largest cog. Tight means the cage stops short. Too loose and it overshoots, which means the chain ends up in the spokes or grinding against the frame.
An H-screw problem shows up when the chain won’t reach the smallest sprocket, or it struggles getting there like it’s hitting an invisible wall. Turn the H screw counterclockwise — one quarter turn — and try again. The chain should reach that smallest cog cleanly without the jockey wheel rubbing the next sprocket over.
The L screw being too tight is sneakier. I’m apparently a chronic over-tightener, and a vintage Shimano RD-5700 I inherited taught me that the hard way. I’d cranked the L screw down so far trying to prevent chain sag in the lowest gear that every upshift from the 28-tooth cog became a painful hesitation. Three full turns counterclockwise and the problem disappeared completely. That was 2019.
Test this without a stand if you don’t have one. Pedal slowly in your lowest gear — smallest chainring, largest cog — and click up one sprocket. Clean pop means you’re good. Hesitation means loosen the L screw a quarter turn and try again. Once the cage moves freely without touching the chain stay, you’re done.
Bent Derailleur Hanger — How to Spot It Without a Tool
The hanger is a small aluminum tab that attaches the derailleur to the frame. It’s sacrificial by design — built to absorb crash impact so the derailleur and frame don’t. Bent from a crash, corrosion, or a season of careless garage storage, a hanger throws the jockey wheel out of alignment with the cassette. Cable tension adjustments do nothing for this.
Here’s the visual check that costs nothing. Stand directly behind the bike. Pedal slowly so the chain rotates through the cassette. Watch the jockey wheel — the lower pulley on the derailleur cage. It should track straight up the center of each sprocket. If it looks offset — sitting higher on one side of a sprocket than the other — the hanger is bent.
Secondary check: spin the pedals by hand with the chain sitting on the middle sprockets and watch how the cage naturally hangs. A bent hanger leaves the whole derailleur tilted, leaning away from the cassette at an angle that looks slightly wrong even if you can’t immediately articulate why.
A proper hanger alignment tool — the Park Tool DAG-2 runs about $42 at most retailers — does this job precisely. I owned one for two full years before I actually used it. The process involves bending the hanger back in tiny increments, using the tool as a lever, checking alignment after each micro-adjustment. Methodical and slow.
The easier path: hangers cost roughly twenty to forty dollars depending on frame model, and they’re designed to be replaced. That’s the whole point of them. Most local shops keep common hangers in stock. If you hit something hard enough to bend yours, replacement is honestly the smarter call anyway.
Still Not Fixed — When to Look at the Derailleur Itself
Cable tension is correct. Limit screws are set. Hanger is straight. Shifting still feels rough. That’s what makes this problem endearing to us mechanics — it always has one more layer. Now you’re looking at the derailleur itself.
Jockey wheels wear out faster than people expect. They’re small plastic cogs spinning thousands of rotations per ride, and after a few thousand miles they develop flat spots and lose tooth definition. The chain path gets sloppy. Shimano sells replacement jockey wheel cartridges for eight to fifteen dollars, but you need the derailleur model number first — check the cage for a code stamped into the side, something like RD-5800 or RD-M6000. Match it exactly.
A bent derailleur cage is a different problem. The cage is the parallelogram arm holding both jockey wheels. It bends from crashes or from a chain jam bad enough to torque it sideways. Bent cages cause the same jockey wheel offset you’d see with a bent hanger, but hanger correction won’t fix it. At that point a new derailleur makes more financial sense than chasing it further.
The B-tension screw might be the best option to check next, as derailleur geometry requires specific clearance between the cage and the largest cog. That is because too little clearance means constant rubbing, and too much means the cage swings toward the spokes on big downshifts. While you won’t need precision instruments, you will need a handful of millimeters of visual gap — roughly three to five — between the jockey wheel and the largest cog. A fingertip works fine as a rough spacer.
Verified everything above and shifting is still inconsistent? The derailleur has fatigue damage that no adjustment will correct. Replacement is the realistic path forward. A mid-range Shimano or SRAM unit runs fifty to ninety dollars and typically includes a new cable, a fresh hanger, and a jockey wheel cartridge — often less expensive than hunting down individual components one piece at a time.


Leave a Reply