
“`html
Signs Your Derailleur Hanger Is Bent — Not the Derailleur Itself
A bent rear derailleur hanger has gotten complicated with all the misinformation flying around. Last season, I crashed hard into a curb during a group ride and spent three days convinced my entire drivetrain was ruined. Turns out, it was just the hanger — a $25 part instead of a $200 derailleur replacement. That’s what makes this distinction endearing to anyone who’s ever had to dig into their bike budget.
Here’s what a bent hanger actually looks like in real riding:
- Chain struggles to shift up to the largest cogs — You ask for the big ring. Nothing happens. Or it takes three attempts. The derailleur sits too far inboard because the hanger is angled wrong, so the chain can’t reach those teeth.
- Shifting feels inconsistent across the cassette — Some gears shift perfectly. Others feel sticky or mushy. This happens because the derailleur cage is now at an angle. It’s perfectly aligned for, say, the 4th cog, but garbage for the 7th.
- The derailleur looks visually offset when you stare at it from behind — Stand behind the bike. Look at the derailleur cage compared to the cassette. If it looks like it’s leaning inboard or outboard, that’s your hanger lying.
- Rubbing noise only happens at certain cog positions — This is the big one. A bent hanger means the cage is at an angle. So when you’re in some gears, the chain rubs the cage. In others, it doesn’t. This is the opposite of a twisted derailleur body, which usually rubs everywhere or nowhere.
- The derailleur body itself looks fine but feels wrong — No broken welds. No obviously snapped parts. The derailleur just doesn’t work right. That’s 80% of the time a hanger problem.
Why this distinction matters: a derailleur hanger is a replaceable component — basically a metal adapter between your frame and the derailleur. The derailleur itself? Way more expensive. If you misdiagnose and buy a new derailleur when you only needed a hanger, you’ve just wasted serious cash.
How to Diagnose a Bent Hanger in 3 Steps
Diagnosing a bent hanger takes about five minutes. You won’t need specialty equipment, just the basics most riders already own.
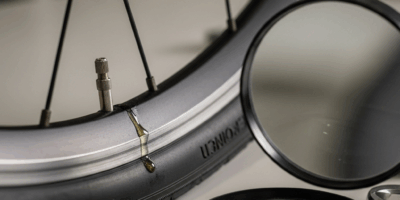
Step 1: Visual inspection from the rear
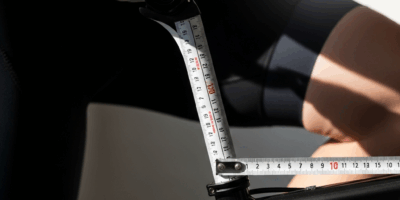
Remove your wheel or just flip the bike upside down. Get behind the derailleur. Look straight at the jockey wheel — the upper wheel in the derailleur cage. It should line up vertically with the cassette sprockets. If the cage appears to lean left or right relative to the cassette, your hanger is bent. Sometimes it’s obvious. Sometimes subtle. You might see a 3-5mm offset. That’s enough to destroy your shifting.
Step 2: Use a straightedge or old spoke
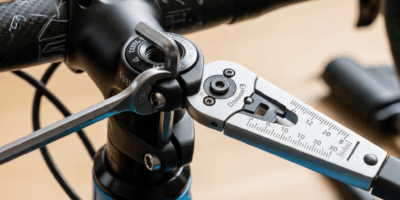
Grab an old spoke or a ruler. Hold it vertically against the derailleur’s jockey wheel cage. The spoke should sit flush against the cage. If there’s a gap — daylight showing between spoke and cage — then you have a bend. Some people use a hanger alignment tool like the Park Tool DAG-2 ($80). I don’t own one. An old spoke works fine for diagnosis.
Step 3: Spin the wheel and listen
Put the wheel back on. Shift through every single gear while slowly spinning the pedals — or the wheel if the bike is upside down. Listen for rubbing. Watch where it rubs. If it rubs consistently only in specific cogs, particularly the largest or smallest, you’ve got a hanger angle issue, not a derailleur body problem.
Straightening vs. Replacing Your Hanger
Before you grab an Allen key, know when straightening works and when it doesn’t.
Straightening works best for minor bends on aluminum hangers. We’re talking about bends under 2-3mm that happened from a light crash or accidentally bumping a parking rack. These are usually repairable without permanent metal damage.
Replacement is smarter when you’re dealing with carbon fiber frames, severe bends (anything over 4-5mm or visually obvious), or if you’ve straightened the same hanger twice in six months. Carbon frames are unforgiving — if the hanger area around the bolt holes gets damaged, you risk cracking the frame itself. Also, hangers are frame-specific. A Specialized hanger doesn’t fit a Trek. They’re cheap enough ($20-50) that buying the right one for your frame model is the smarter play.
Here’s my honest take: if you’re confident it’s a minor bend and you’ve done this before, straightening is fine. If this is your first time or the damage looks severe, buy a replacement hanger. You’ll sleep better. Probably should have opened with this section, honestly.
Step-by-Step Hanger Straightening Process
Assuming you’ve diagnosed a minor bend and want to straighten it yourself, here’s what to do.
Remove the wheel — Take off the rear wheel entirely. This gives you full access to the hanger and derailleur cage.
Identify the bend direction — Look at where the cage is leaning. Inboard? Outboard? Make a mental note. You’re going to apply pressure in the opposite direction.
Use an Allen key or hanger alignment tool — Get a 5mm or 6mm Allen key (check your hanger’s bolt size). Insert it into the derailleur mounting bolt. Gently, slowly apply pressure to bend the hanger back toward the plane of the cassette. This is not a hammering operation. Think of it as precision adjustment, not auto body work. Small movements. Maybe a quarter-inch per attempt. The metal will resist at first, then give suddenly. That’s normal. You’re not “breaking” anything — you’re stress-relieving the aluminum.
Recheck with your straightedge — After each small bend, grab your spoke or ruler again. Hold it against the cage. Keep going until the spoke sits flush with the cage across its entire height. I’ve spent 10 minutes on single bent hangers. It’s worth the time.
Reinstall and test — Put the wheel back on. Do the full shifting test again. All gears, both directions. The rubbing should be gone. Shifting should feel snappy. If there’s still rubbing, you either didn’t straighten enough or the bend was too severe for this method. Replace the hanger at this point.
How to Avoid a Bent Hanger on Your Next Ride
Once you’ve dealt with a bent hanger, you never want to deal with another one.
Carry your bike with the derailleur facing inboard — toward your body — when you’re walking or transporting it. This protects the derailleur cage from impacts. Seems simple, but most people just grab the frame randomly.
Avoid sideways falls onto the drivetrain side. This is pure luck some days, but when you do crash, try to fall on your left shoulder or hip, not your right. Your right side is where the derailleur lives.
Don’t lock your bike by the frame in a way that puts stress on the derailleur. Some racks or locks can flex the hanger if they’re attached wrong. I’ve seen it happen.
Check your hanger alignment every 3-4 months if you ride regularly. Two seconds with a straightedge. It catches problems before they get bad.
“`

Leave a Reply