How to Tell If Your Chain Is Actually Too Loose
Road bike chain troubleshooting has become tricky with all the conflicting advice flying around. As someone who has stood in a cold garage at 6 a.m. cursing at a slapping chain before a Saturday ride, I spent months getting comfortable with this subject. Today, I will share it all with you.
But what is a “loose chain,” really? In essence, it’s a chain that can’t maintain proper engagement with your drivetrain components. But it’s much more than that — on a geared road bike, loose means something completely different than it does on a single-speed. Your derailleur handles tension on a geared setup. On a fixed gear or single-speed, the chain needs actual mechanical tightness. Different problems. Different fixes entirely.
The physical signs tell you which situation you’re dealing with. Chain dropping off the smallest chainring under load? Audible slapping during shifts? Skipping teeth on the cassette? Real problem. But if it just looks saggy and still shifts cleanly without skipping — you might actually be fine.
Here’s the quick check I use before doing anything else. Grab the chain midway between the crankset and rear wheel and pull it perpendicular to the frame. Half an inch of movement is normal. More than that on a geared road bike? Keep investigating. Less? Your chain might be too tight, which creates its own set of headaches.
Important part first. Most riders skip straight to adjustment and waste thirty minutes they didn’t have.
Check Chain Wear Before You Do Anything Else
A stretched chain pretends to be a loose chain. Skip past the mistake I made — I spent a full hour tweaking my Shimano 105 derailleur before realizing the chain itself was completely shot. Embarrassing in retrospect.
Grab a chain wear indicator. Shimano makes one for about eight dollars — the TL-CN42 if you want the specific model — and it’s worth every cent. Two notches on the tool. Slot your chain into the first notch. If it drops all the way through, you’re sitting at 0.5% wear. Normal. Keep riding. Flip to the second notch. If the chain seats flush, that’s 0.75% wear, and replacement is your actual fix here. The chain doesn’t gradually stretch and then bounce back. It just gets longer and longer until it’s useless.
No tool handy? Look at the teeth on your smallest cog. Worn cassette teeth go sharky — little triangles instead of the rounded bumps you started with. Chain keeps dropping specifically on that ring? The cassette is probably worn too. Stretched chains and worn cassettes are basically roommates. You can’t fix one and ignore the other.
This step alone saves hours. Trust me on it.
Fix a Loose Chain on a Geared Road Bike
So, without further ado, let’s dive in. Your derailleur is doing the heavy tension work on a geared road bike — the chain isn’t supposed to be drum-head tight. It needs just enough slack that the derailleur can pivot freely without the chain binding against the frame or itself.
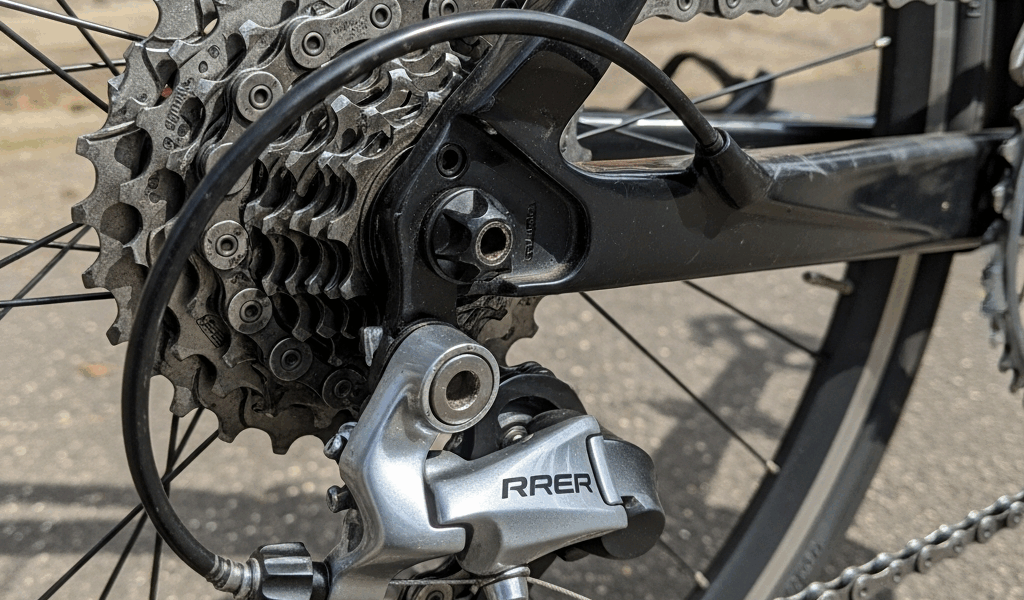
The B-tension screw is what you’re looking for. Small setscrew, usually sitting on the back plate of the derailleur body. One quarter turn makes a noticeable difference. Clockwise moves the jockey wheel cage forward and tightens tension. Counterclockwise backs it off. That’s the whole mechanism.
Here’s the step-by-step:
- Shift onto the smallest chainring and largest cog — granny gear to granny. This pushes the derailleur to its furthest rearward position.
- Look at the upper jockey wheel. It should sit roughly 5 millimeters below the largest cog without actually touching it.
- If there’s more gap than that, turn the B-screw clockwise one quarter turn.
- Pedal and watch the chain tension in that position. Adjust again if it still looks off.
- Shift through every gear combination. Listen for skipping or dropped chains. If everything runs cleanly — stop adjusting. You’re done.
Just replaced your chain or swapped cranksets? One more thing to check — the big-big rule. Shift to the largest chainring and the largest cog simultaneously. That combination is a mechanical stress test, not something you’d use on an actual ride. If the derailleur cage contacts the chainstay or the chain binds up, your chain is too long. Pull one link and try again. Massive slack in that position suggests the chain is too short, though that’s rarer on road bikes.
I’m apparently guilty of assuming loose chain always means tighten everything — and a Park Tool DAG-2.2 derailleur alignment gauge later, I discovered my cage was bent the whole time. Check that the derailleur body is straight. Spin the jockey wheels by hand. They should spin freely with zero rubbing. A bent cage mimics loose-chain symptoms without you actually having a loose chain.
Fix a Loose Chain on a Single-Speed or Fixed Road Bike
Single-speeds live by a completely different rulebook. No derailleur magic happening here — the chain needs real mechanical tension, full stop.
Horizontal dropouts on your frame? You’re in luck. The axle slots run front-to-back, which means you can slide the rear wheel backward to dial in tension. Loosen the 15mm axle bolts just enough to allow movement — not all the way, just enough. Pull the wheel back evenly on both sides. A piece of tape marking your starting position helps keep both sides moving equal distances. That same half-inch deflection check applies here. Tighten the axle bolts firmly — not gorilla-tight, but properly firm. Recheck the tension after tightening. It’ll feel slightly tighter once everything is fully snugged down.
Quarter-inch of movement is about right for a single-speed. Much more and the chain skips under hard pedaling efforts. Much less and you’re risking a snapped chain or a bent crank — neither of which you want to discover mid-ride at mile 40.
Fixed-gear riders with vertical dropouts face a different setup entirely. Those bikes use chain tensioners — spring-loaded devices mounted below the chainstay. If your tensioner has given up, replacement is the move. A worn tensioner physically cannot maintain proper tension, and no amount of manual fiddling changes that. That’s what makes the tensioner so endearing to us fixed-gear riders — when it works, it just works quietly in the background. When it doesn’t, everything falls apart fast.
When a New Chain Is the Only Real Fix
While you won’t need a full workshop teardown, you will need a handful of basic tools and a replacement chain. First, you should confirm the wear indicator reading — at least if you want to avoid buying a new chain only to destroy a worn cassette within fifty miles.
Replace the chain if any of these apply: your wear indicator bottoms out at the 0.75 notch, you’ve rejoined the chain multiple times with quick links or connecting pins, or you’ve already removed links and slack keeps coming back anyway.
A new chain might be the best option, as a worn drivetrain requires compatible components throughout. That is because a fresh chain on worn cassette teeth will skip almost immediately — the new chain’s tight tolerances don’t mesh with the hooked, asymmetric wear pattern on old cogs. Quick visual check takes two minutes. Look at the teeth. Sharky profile means replacement.
Straightforward work, all of it. You’ve genuinely got this.


Leave a Reply